Tech
How to Use Piso WiFi Pause Time 10.0.0.1 for Better Network Control

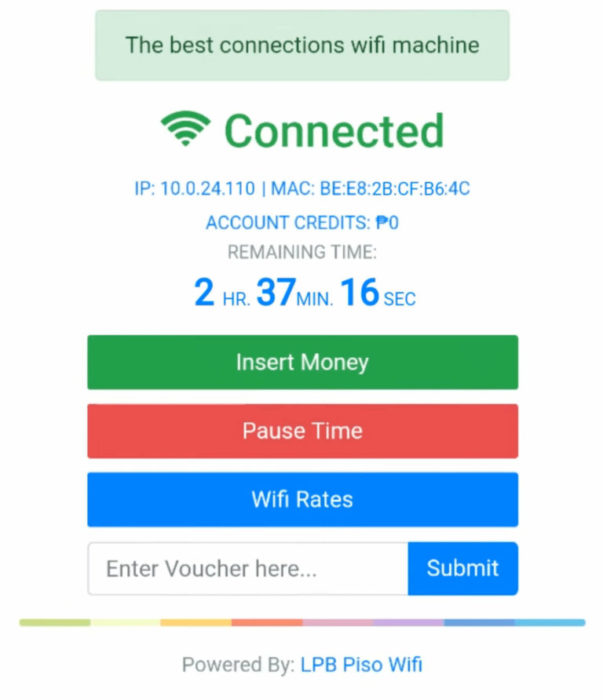
The Piso WiFi system is a widely used public internet service, offering a convenient way to provide internet access to customers in establishments such as cafes, hotels, and even residential areas. However, managing bandwidth and controlling network usage can be challenging, especially when multiple users are connected at once. Fortunately, Piso WiFi comes with a powerful tool to help you manage your network effectively—the Pause Time feature. In this guide, we’ll explain how to use the Piso WiFi Pause Time feature via the 10.0.0.1 admin panel and discuss its benefits and limitations.
What is Piso WiFi Pause Time?

Piso WiFi Pause Time is a function that allows network administrators to temporarily suspend internet access for a set period. Whether you need to reduce excessive usage, save bandwidth, or control the timing of network availability, this feature provides a simple and efficient way to manage your network.
By using the pause function, all users connected to the network will be temporarily blocked from accessing the internet. The default time intervals for the Pause Time feature are 30 minutes, 1 hour, and 2 hours, but these can be customized based on your needs. This makes it easy to manage network availability, either for technical reasons or simply to conserve bandwidth during high-traffic periods.
Also Read: Valorant Walkthrough: How To Lower Ping In Valaront?
Why Use the Piso WiFi Pause Time?
There are several scenarios in which the Piso WiFi Pause Time feature can be helpful:
- Controlling excessive data usage: If certain users are consuming too much bandwidth, pausing the network can help manage data distribution.
- Maintaining control over public WiFi: In establishments like cafes or hotels, the pause feature can be used to enforce timed access to WiFi services.
- Saving bandwidth during off-peak hours: You may want to disable network access during late-night hours when fewer people are using the service.
Now, let’s dive into how you can access and configure the Piso WiFi Pause Time feature.
How to Access the Piso WiFi Admin Panel (10.0.0.1)
Before you can configure the Pause Time settings, you need to log into the Piso WiFi Admin Panel. Follow these simple steps:
- Open your browser: On any device connected to the Piso WiFi network, open your preferred web browser.
- Enter the IP address: Type
http://10.0.0.1in the browser’s address bar and hit Enter. This will take you to the Piso WiFi Admin Panel login page.
- Login credentials: You will be prompted to enter your username and password. These should have been provided when you initially set up your Piso WiFi system.
- Access the Admin Panel: After successfully logging in, you will now have access to the admin dashboard, where you can configure network settings, including the Pause Time feature.
Also Read: Top 5 Games to Boost Your Creativity
How to Set Up and Use the Piso WiFi Pause Time
Once you have accessed the Piso WiFi Admin Panel, follow these steps to configure and activate the Pause Time feature:
- Locate “Internet Access Time”: Scroll through the dashboard until you find the option labeled “Internet Access Time.”
- Choose the pause duration: You will see options for preset time intervals—30 minutes, 1 hour, and 2 hours. Select your preferred duration by clicking on the radio button next to it.
- Apply your selection: Once you’ve chosen the desired time interval, click on the “Apply” button to save your selection.
- Activate the pause function: To activate the pause, look for the “Pause” button beneath the “Internet Access Time” settings. Clicking this button will immediately disable internet access to all connected users for the selected period.
Once the pause function is active, your network will become temporarily inaccessible, and users attempting to connect will be unable to access the internet until the pause period expires or the pause is manually disabled.
Important Notes:
- The pause function is a global network control, meaning it affects all users connected to your Piso WiFi network. There is no option to pause access for specific users only.
- Be cautious when using this feature in a business setting where users may rely on uninterrupted access to WiFi services.
Also Read: How to Fix Modern Warfare 2 Problems/Freezings
Advantages and Disadvantages of Piso WiFi Pause Function
Advantages:
- Bandwidth Management: The pause feature helps you manage bandwidth by preventing users from hogging network resources during peak times.
- Easy Control: It offers an easy way to control network access, particularly in public places where users may be connected to your Piso WiFi for long periods.
- Customizable Timing: You can select from preset intervals or customize the pause duration, giving you flexibility in managing access.
Disadvantages:
- All-or-Nothing Access Control: The pause function affects all users on the network. Unfortunately, you can’t restrict access to just a few users, which can lead to inconvenience for those who aren’t causing excessive usage.
- Potential Customer Dissatisfaction: If you run a business where customers rely on consistent WiFi access, suddenly pausing the network can lead to frustration and complaints.
- Limited Use Cases: For businesses that rely on continuous customer access (such as cafes or co-working spaces), pausing the network might not be practical or desirable.
Understanding these pros and cons can help you make an informed decision about when and how to use the Piso WiFi Pause Time feature.
How to Disable Piso WiFi Pause Time
If you’ve activated the Pause Time and want to restore internet access before the pause period ends, follow these steps to disable the feature:
- Log in to the Admin Panel: Just like before, use
http://10.0.0.1to access the Piso WiFi Admin Panel. - Navigate to “Pause Access”: Once logged in, scroll down to the “Pause Access” section in the dashboard.
- Enter your password: You’ll be asked to confirm your action by entering your admin password.
- Click “Apply”: After entering your password, click “Apply” to deactivate the pause. The network will immediately become accessible to all users again.
Quick Tip:
If you frequently use the pause function, make sure to communicate with your customers or users ahead of time, so they know when the network will be unavailable. This can help avoid unnecessary frustration.
Conclusion
The Piso WiFi Pause Time feature is an excellent tool for managing network usage and controlling bandwidth, particularly in environments where multiple users share a single internet connection. By following the steps in this guide, you can easily activate, configure, and disable the pause function via the 10.0.0.1 Piso WiFi Admin Panel.
However, keep in mind that the pause function is a blunt tool—it affects all users, so it’s not suitable for targeted control. In business environments, especially those reliant on public WiFi access, using this feature requires caution to avoid potential customer dissatisfaction.
Overall, the Piso WiFi Pause Time feature can be a great asset for network management, especially when used strategically. With a clear understanding of its benefits and limitations, you can leverage it to optimize your WiFi network’s performance and user experience.

In the current environment, changing a PDF file into an editable Word document is an important task for people of all professions, students, and even for personal use. Modifying contracts, attending to resumes, or even ‘editing’ repurposing reports in the right way and maintaining the original document’s format is important. Most of the time, due to the carelessness of the software, conversion results in distortion, text separation, graphical separation, and other layout damages.
Change PDF to Word Online
Transforming documents manually is not very efficient and taking a PDF document and changing it to a Word document PDF to Word converter is the best way to do so. One of the benefits is that no prior software installation is needed. Online tools work for a range of different types of files that students and the business community work with in a document, and after posting it, they will get their Word file in a very short time. These user-focused tools are designed to provide the best possible results with attention to minimalism, and the user document gives great results. Users should ensure that their converter is working with a trusted site to prevent information leaks.
Transform a PDF to a Word file for editing.
Efforts of document editing are made simpler with a document converter, as it helps in maintaining formats. One of the benefits is that when branching documents, content can easily be placed in its designated area. Photos, tables, and other specified content are placed in their respective area for maintenance. Word documents can be business-based or academic and lend themselves with ease. Word files can easily be made. It is now possible to edit images and remodel pictures that can be done as simply as text editing. With the new tools available, document editing has helped to ease the process of working with a new document.
Free PDF to Word Converter
Free PDF to Word converters can be really useful, especially if it is your first time using these types of tools. These converters have no cost attached to them. They are typically very user-friendly, featuring drag-and-drop upload, a variety of output formats, quick download, and ease of use. It is very easy to get your work done using basic features, unlike paid ones. It’s even better when there are no watermarks. For students and freelancers, these tools are very helpful for completing their work within budget.
PDF to Word Converter Reviews
The best PDF to Word converter is determined by how fast it gets the job done, its accuracy level, and how easy it is to use. The best converters are those which ensure that there is no change in the layout, fonts, and formatting of the document, even when it is a complex one which includes tables, columns, and graphics. The benchmark for the best quality is Adobe Acrobat, Smallpdf, and Nitro PDF. Pay attention to features like batch conversion, OCR, language, and cloud storage, as those are critical. Customer reviews, security benchmarks, and technical assistance are equally as important as the PDF functions in determining how well it will serve your professional requirements.
Steps to Take to Change a PDF Document Into Word
First, you need to find a reputable online converter. Drag and drop your PDF document on the platform to upload it. After that, click on “Convert to Word or a button with a similar name. It is very important to look at the file after it has been converted. It is very important to check the converted file for image, table, or scanned document accuracy, to ensure nothing is misplaced or missing after the change.
Change PDF Into Word Document While Maintaining The Original Style
Formatting is very important in the conversion of a document from a PDF file into a Word document. It is pivotal for PDF files that are resumes, invoices, or design templates. Certain tools guarantee that your document will look as precise as the original document. Sturdy PDF to Word converter offers strong layout detection and advanced font detection. This way, the loss of headings, bullet points, indentation, and spacing is avoided. Some software provides the option of setting document styling parameters before conversion. In scenarios where design consistency matters, do not settle on a basic tool. Go for the gadget converter with greater accuracy, sophisticated features, and professional-grade options.
Timely PDF to Word Transformation
In any work setting, time is always of the essence, so a timely PDF to Word transformation is critical. Even large documents need to be processed in seconds. Irrespective of the speed, premium tools always have a swift turnaround and layout precision. Many platforms utilising cloud technology provide swift processing and can handle concurrent conversions without lag. If you’re dealing with bulk conversions, try platforms that guarantee speed and have dedicated servers with optimised batch processing features.
PDF to Word Batch Conversion Equipment
An office professional who manages a great number of documents will find PDF to Word batch conversion equipment a necessity. The ability to upload several PDFs for conversions saves hours of work. And, it’s perfect for advanced business, teaching, and legal professionals.
Secure PDF to Word Converter
It is always important to protect your confidential documents. With a safe PDF to Word Converter, encryption is done while uploading documents and files are deleted right after conversion. Always look out for SSL encryption, strict data retention policies, and rigorous data privacy. Business, healthcare, and legal professionals who use these tools need to be GDPR compliant and have password-protected conversions. Trust seals, customer reviews, and privacy policies are good indicators of a secure service.
No Download PDF to Word Converter
They can be accessed through a browser, so no software installation is needed. Cloud-based converters are great for on-the-go edits, travelling, or while on mobile data. As there are no downloads, clutter and malware risk is eliminated. These converters are great for casual and remote workers.
Conclusion
Converting documents from PDFs to Word shouldn’t be difficult if you have the right tools. The new sophisticated converters available online that offer automated smart layout recognition, batch processing, and privacy ensure safety and quick edits. Users no longer have to edit from the very beginning. Deals and scanners, resumes or reports, using a top-notch PDF to Word converter makes sure that the resumes and documents remain user-friendly and professional. Do More Than Just Change The Format, Do It With Absolute Certainty.

Traveling with tech can be stressful. These days, a typical collection can include everything from laptops and drones to VR headsets, 3D printers, DSLR rigs, or entire streaming setups. When you’ve got thousands of dollars worth of gear that needs to be safely transported, it’s nerve-wracking to say the least. Whether you’re hauling devices to a con, filming in the wild, or moving home, the rules are simple: pack smart, protect everything, and plan for the worst.
Make a Plan
Remember the six Ps: proper prior planning prevents poor performance, so begin by separating your gear into categories:
- Fragile: delicate items like camera lenses, drones, monitors, and screens.
- Heat-sensitive: including lithium-ion batteries, SSDs, and 3D printer filament.
- Data-critical: hard drives, SD cards, and so on..
- Heavy or awkward: things like mounts, tripods, and ring lights.
Then, make a detailed checklist of everything you have on Notion, Airtable, or even a good old-fashioned spreadsheet. Include serial numbers. Label your cables, cords, and accessories. Take photos of everything. If something goes missing or gets broken, you’ll have proof of its condition beforehand.
Back Up and Back Up Again
Replacing a cracked monitor isn’t the end of the world. However, losing footage or important keys stored on an external hard drive could be a critical loss. Triple back up everything: in the cloud, on an SSD you can carry, and on a hard drive in a waterproof case. If you’re transporting an entire desktop setup, use drive cloning or imaging tools. Encrypt drives and SD cards if you’re carrying sensitive or client information. It’s always better to be safe than sorry.
Use the Right Cases and Padding
For high-value setups, don’t wing it with bubble wrap and duct tape. Get professional hard cases that offer watertight, airtight, and crushproof protection. The investment is worth every penny. For things like gimbal stabilizers and VR setups, make sure you have the right custom foam inserts. If you’re moving large drives, add foam bumpers to reduce vibration damage.
Smaller items that you want to keep on your person, like a laptop, camera, or handheld gaming devices, could travel well in a shock-absorbing backpack. And if your gear needs to sit for a bit (or if it’s summer) look for a local moving company that offers climate-controlled storage or moving vehicles.
Control for Heat and Humidity
Overheating is a real risk. You’d be surprised how quickly tech can fry in warehouse storage or a van with no AC. To combat hot or humid conditions, use insulated tech wraps or thermal liners inside hard cases. Also, include desiccants (like silica gel sachets) and humidity indicators, especially for gear with exposed sensors or metal parts, like analog synths.
Separate batteries, and if you’re flying, don’t forget to follow airline rules for lithium-ion packs. For 3D printing materials like filament and resin, store them in vacuum-sealed bags. Always use desiccants, as they’re magnets for moisture. Lastly, never leave your gear in direct sunlight or in a parked vehicle. Temperatures can soar faster than you realise.
Endnote
Your tech may be your livelihood, or just your pride and joy. Either way, it deserves to be treated with care so it arrives at its destination safe and sound. Pack for four key elements: heat, shock, weight, and data loss. Invest in the right materials, label your cords, and most importantly, backup everything. You’ve poured time, money, and passion into building your dream setup. Some patience and effort now will save you a whole lot of heartbreak later.

The Role of Custom World Seeds in Valheim
Valheim’s world generation system is powered by “seeds,” unique codes that determine the landscape of each game world. Custom world seeds allow players to discover or create environments tailored to their group’s ambitions, whether seeking challenging boss placements, beautiful landscapes for building, or exciting exploration opportunities. The popularity of sharing and experimenting with unique seeds highlights a core part of Valheim’s replay value, as no two worlds are ever the same. These adventures are realized only when hosted on a dependable server that guarantees accessibility and data integrity for every player involved.
The Value of Reliable Server Hosting
A stable and well-maintained hosting environment offers much more than just a space to play; it is the foundation of a group’s entire custom world experience. Continual uptime means groups can log in from different time zones, explore new terrain, and leave their mark on the world without fear of losing progress. For those who want true reliability and seamless access, a dedicated Valheim Server delivers an environment where frequent automatic backups ensure that every towering fortress, hidden stash, or quest completed is securely stored, even during unexpected outages. These assurances set the stage for players to feel confident building, collaborating, and experimenting on their hand-picked terrain. As highlighted by industry reporting, server stability is now viewed as a must-have for groups seeking to capitalize on Valheim’s sandbox potential fully.
Community Collaboration and Customized Gameplay
Stable hosting unlocks the true spirit of collaborative exploration. Teams can coordinate expeditions to distant mountains or plan elaborate construction projects without concern for random disconnects or performance lag. Custom seeds add another layer of excitement, letting communities vote on world layouts or pursue unique biomes they might not find elsewhere. A group agreeing on a rare or particularly challenging world seed often inspires greater creativity, problem-solving, and teamwork. This sense of shared purpose keeps communities invested for the long haul. Trusted moderation and secure hosting allow uninterrupted social bonds and collaborative stories to flourish.
Technical Management and Security
Managing a custom world seed on a private server involves balancing technical setup with everyday reliability. Server administrators must consider performance specs, safe data storage, patch management, and fair play guidelines. Fortunately, dedicated hosting platforms have established strong systems for user-friendly updates, regular backups, and access controls. With private servers, communities have control over who can join and can prevent common problems such as tampering or griefing that sometimes disrupt public games.
Creative Builds and Lasting Impact
A reliable server’s collaborative energy and technical support bring out the best in creative builds. Players have constructed everything from towering castles and massive villages to labyrinthine dungeons and themed towns—all made possible by uninterrupted access to their worlds. Projects that span weeks or months thrive only when supported by consistent server performance and active community engagement. These custom seeds and their collective efforts create stories and landmarks that become fixtures of a group’s Valheim journey, strengthening the sense of accomplishment and belonging.
Looking Ahead: The Future of Custom Worlds
As Valheim’s player base grows, the appetite for personalized game worlds and custom seeds will keep expanding. With stable server hosting, casual adventurers and seasoned builders can safely push the boundaries of what’s possible, experimenting with mods, large-scale builds, and epic social events. The combination of reliable technology and imaginative world design stands poised to make custom Valheim seeds a defining feature of cooperative online gaming for years to come.
-
 Guides6 years ago
6 Proven Ways to Get more Instagram Likes on your Business Account
-
 Mainstream11 years ago
BioWare: Mass Effect 4 to Benefit From Dropping Last-Gen, Will Not Share Template With Dragon Age: Inquisition
-
 Mainstream7 years ago
How to Buy Property & Safe Houses in GTA 5 (Grand Theft Auto 5)
-

 Guides1 year ago
Free Fire vs PUBG: Comparing Graphics, Gameplay, and More
-
 Casual2 years ago
8 Ways to Fix Over-Extrusion and Under-Extrusion in 3D Printing
-
 Mainstream13 years ago
Guild Wars 2: The eSports Dream and the sPvP Tragedy
-
 Gaming News2 years ago
Swiping, Tapping, and Tilting: How Mobile Games Are Played Today
-

 Featured1 year ago
Accumulator Bet – Guide to Australian Online Sports Betting